Create a Notebook

Create a Notebook

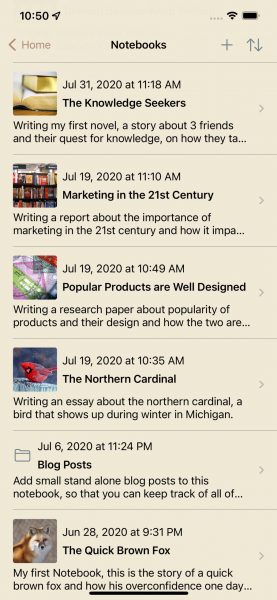
Whatever you plan to a write, e.g. a book, essay, report, assignment or research paper, you create a notebook for that, a notebook is like a folder, you add notes or writings of what you are writing to a notebook, e.g. if you are taking notes about a book that you are writing you can add it to that notebook, once in the notebook you can convert those notes to chapters and arrange the chapters in the order that you want and later publish & print the notebook in pdf once you are ready with a draft version.

Notebooks
Simulator Screen Shot - iPhone 12 Pro Max - 2022-06-20 at 10.50.05

Create a new Notebook

Simulator Screen Shot - iPhone 12 Pro Max - 2022-06-20 at 09.21.56

To create a new notebook tap the + icon as shown in the red circle in the first screenshot, it will display the compose New Notebook view, tap the title placeholder to add a title, tap the note placeholder to add short description about the notebook that what is the notebook about, you can also add a photo about your notebook, to add a photo tap the camera button to take a pic or tap the photo library icon to pick a photo from the photo library. Once you have created your notebook you can start adding notes and photo notes to the notebook.

Continue ReadingCreate a Notebook

Text Settings

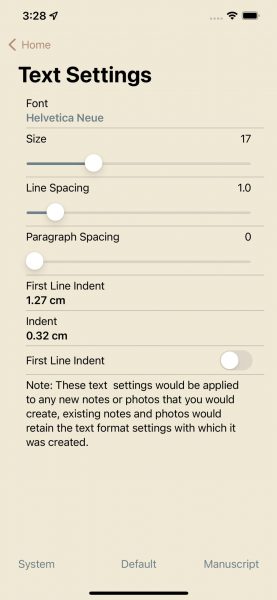
Simulator Screen Shot - iPhone 12 Pro Max - 2022-06-20 at 15.28.51

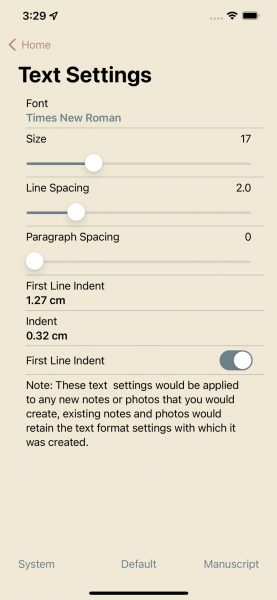
The default text format settings is font Helvetica Neue as shown in the above Text Format Settings screenshot along with other text formatting attributes such as size, line spacing etc. this text format settings is used for all the new notes that you compose, so if you compose a new note then it will have all the above text format settings that you have set,  for existing notes you cannot change the font but there are other attributes that you can change such as size and line spacing, you can also customise the text format settings by choosing a font and setting other attributes such as size, line spacing etc., to revert back to the default text format settings tap the default button on the toolbar at the bottom of the screen. Update this text format settings often to change the font to a style that you want, it will be applicable to all the new notes that you compose from now on, if you change it then the new changed text format settings will be applicable to all the new notes, so can use different font styles for different purposes, e.g. if you are writing a book then you can use the New York Serif font and if you are composing a personal note then you can use a Sans Serif font such as Helvetica Neue.

Simulator Screen Shot - iPhone 12 Pro Max - 2022-06-20 at 15.29.51

For writers writing a book use the manuscript button to set text settings to industry standard manuscript format, the industry standard is 12 but this size is too small for mobile devices, so the font size for a manuscript is set to 17 which is the ideal font for typing text on mobile devices such as iPhone and iPad, In Notewrap there is also a publish font size which you can further customise and change the font to a style that your publisher wants for the book, e.g. if your publisher’s requirement is Times New Roman font then change font to Times New Roman, as far as the size of the font is concerned keep it to 17 as it is the ideal typing font on Notewrap, you can change it to a size 12 later when you export note, photo or notebook in different formats such as text, rtf, markdown, pdf etc. 

Custom Text Settings

Simulator Screen Shot - iPhone 12 Pro Max - 2022-06-20 at 15.30.53
Simulator Screen Shot - iPhone 12 Pro Max - 2022-06-20 at 15.32.33

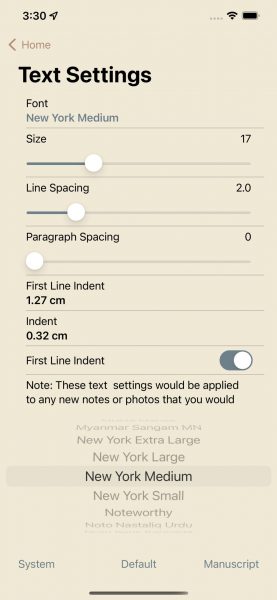
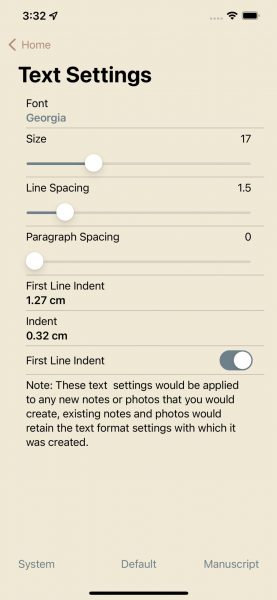
You can further customise text format settings according to your preferences, to change font simply tap the font row and it will display the list of fonts available, roll the drum to pick a font and then tap the background again to dismiss the font picker view, you can also change other attributes such as size, line spacing etc. by tapping circle on the slider and sliding it to change the value, as shown in the second screenshot the font has been changed to Georgia and the line spacing has been changed to 1.5. Use different fonts for different purposes, if you are writing a personal note then choose a font that you personally prefer, if you are writing a professional document such as a book then use a font such as Times New Roman that your publisher would prefer. Remember that the changes will be applicable for the new notes that you compose so do remember to change it back if you are e.g. switching back to writing a personal note after you have taken notes for writing a book.

Continue ReadingText Settings

How to Write a Blog?

Blog Writing Made Simple

Write A Blog

With Notewrap its really simple to write a blog, you write it like any other note and use Notewrap’s elegant text formatting feature to format the text, most of us who write a blog also include one or more images in the Blog, with the recently introduced link feature it’s even more simple to write a blog with images.

To include an image in a blog, first add the image to your website, most website creators like WordPress lets you add images to your website and shows all images in your media folder, you can then simply add that image link to your blog.

When you export a blog to markdown, the link gets converted to markdown image syntax by default so that the image is displayed on your blog, also on WordPress, you can install the Phoenix Media Rename plugin to rename images after you add them to media, to rename image simply go the image in the media folder, tap edit more details, it will show you a text box with the filename, give a simple and meaningful name to your image and then tap update to save the image with the new filename, giving nice meaningful names to your media will also improve your websites SEO.

Once you have exported blog to markdown from Notewrap, you can then use the import markdown tool of the website builder to import or convert markdown to html post, e.g. for WordPress you can install the WP Githuber MD plugin which allows you to paste the markdown text to the left of the window and gives you a preview of the blog on the right and once you are done you can hit the publish button to post the blog.

Continue ReadingHow to Write a Blog?